Installing Windows , xp or win 7
let's
Getting Started
The first step is to start up your PC (herein referred to as “booting” or “booting up”).
Here
you will need to watch your screen. You have to enter your BIOS
setup. It varies from PC to PC which combo of buttons will get you into
the setup. Some it’s F2, while others it’s the Delete key.
Hit
the key needed and enter your BIOS Setup. You want to check the boot
configuration. From there you want to make sure that the order for the
boot devices is set to CD, then HDD (Hard Drive).

Booting from the CD
Now insert your
Windows XP CD. Restart your system. Now you will let the system pass
the POST (Power on Self Test) and let it continue to boot. After the
POST it will search the installed devices for a bootable application.
It should recognize the XP CD as being the first bootable device since
it is in the CD Tray already. You will see something flash on the
screen that says “Hit any key to boot from CD”, here just press a key to
get started with the XP Install.

Now
after you press a key the XP install will start up. It will load the
drivers needed to get this process going. After it loads all the needed
info it will take you to the next screen.
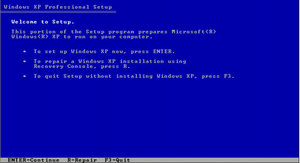
Starting Windows XP Setup
Here
you have a few options. Option 1 is to install XP by hitting Enter.
This is the option you want. The others will be discussed at another
point in time. They are more for XP repairs rather than install. Since
you are installing not repairing you don’t need to worry about those
options.
After
you hit enter it should scan to see if you have Windows XP already
installed. From here it will show you your HDD and ask you what to do
next. I always recommend partitioning your HDD so you can separate your
files. XP only needs about 10GB of space for install and installation
of files. So if you wish to create a partition hit C. If not just
choose the RAW space to install.
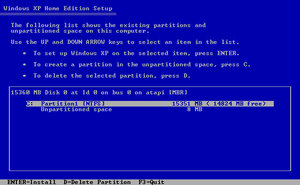
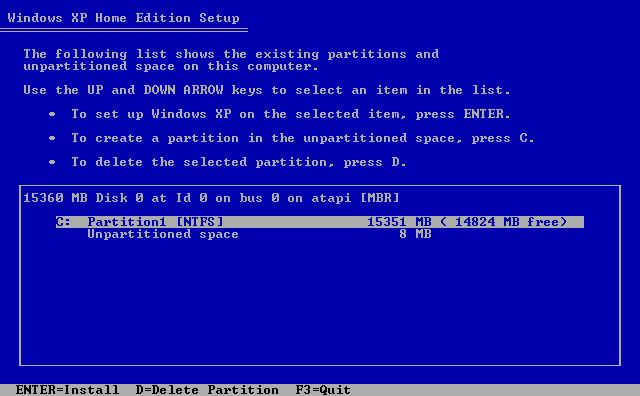
Partitioning your Disks
Some
extra clarification on this section. If you are formatting a drive
already you do not have to partition it. You also do not have to create a
partition. Also if you currently have a partition setup that you are
formatting and not creating you will not have the RAW format drive to
select. You will just select the drive you wish to install to.
If
you wish to delete all partitions you do so by hitting the “D” key.
This will give you a new prompt to verify tha tyou wish to do so. Here
it will tell you to hit the “L” key to delete the partition. From there
you can either create a partition just for the Operating System or you
can use the whole drive. To create a new partition by hitting the “C”
button to create. But Windows oesnt see drives in GB. It is seen in MB.
So you have to remember that 1024MB = 1GB. So if you want a 20GB
partition it would be 20480MB to create a 20GB partition. Then just
click enter to create the partition of the size you want. This is where
it will be in RAW format as stated above.
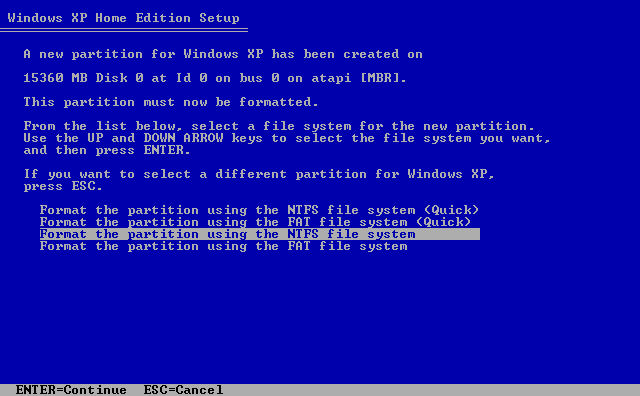
 From
here you will have to choose to format the partition. It will give 4
or 5 options. Option 1 is to Quick Format with the FAT32 file system.
Option 2 is to Quick Format with the NTFS file system. Option 3 is to
Full Format with the FAT32 file system. Option 4 will be to Full Format
with the NTFS file system. Sometimes Option 5 is available which is to
leave the partition alone.
From
here you will have to choose to format the partition. It will give 4
or 5 options. Option 1 is to Quick Format with the FAT32 file system.
Option 2 is to Quick Format with the NTFS file system. Option 3 is to
Full Format with the FAT32 file system. Option 4 will be to Full Format
with the NTFS file system. Sometimes Option 5 is available which is to
leave the partition alone.
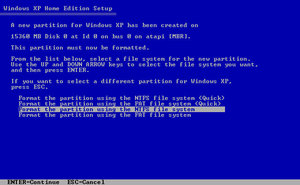 I
always recommend to Full Format with the NTFS file system. This is the
best option which will lead to least amount of errors. This will take
some time depending on the size of the partition/HDD you are
formatting. So go have a coffee or something to eat for a bit.
I
always recommend to Full Format with the NTFS file system. This is the
best option which will lead to least amount of errors. This will take
some time depending on the size of the partition/HDD you are
formatting. So go have a coffee or something to eat for a bit.
Setup Begins
After
it format it will start to load the files needed for the XP install.
This will also take a few minutes depending on your system. After it
loads the needed files it will reboot. Let the system reboot but do not
choose to boot from the CD. Let the system keep loading. This will
force the system to continue the XP install. This is where it will ask
some questions.
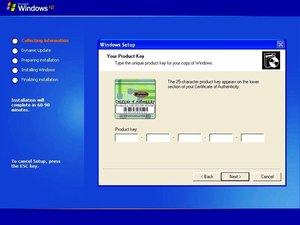
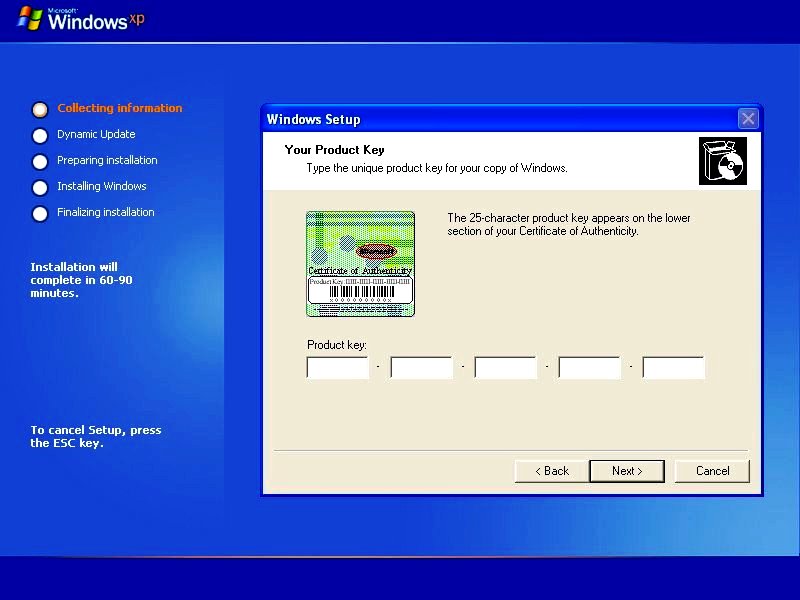
First
it will want your product key – written on the packaging of your
Windows XP, usually on an orange label. It will ask you about your
network setup. It will ask you to choose your region and time zone. It
will ask you if you wish to set an administrator password. This option
is all up to the user. If you wish to set a password this will stop
other users from accessing the Safe Mode Administrator account if they
don’t know the password. Then it will ask you if you wish to rename the
PC name that XP will recognize it as.
 You
can just choose the default settings for almost everything and the
install should go just fine. After it loads all the devices and that it
will reset again. From there don’t boot from CD and let XP load
again. This will start XP up for the first time. Here it will give you
some more options.
To
create users, and then after that it will load to the desktop which has
a guided tour of Windows XP right there. To get more familiar with XP
take the tour so to get to know your newly loaded OS (Operating System) a
bit more.
You
can just choose the default settings for almost everything and the
install should go just fine. After it loads all the devices and that it
will reset again. From there don’t boot from CD and let XP load
again. This will start XP up for the first time. Here it will give you
some more options.
To
create users, and then after that it will load to the desktop which has
a guided tour of Windows XP right there. To get more familiar with XP
take the tour so to get to know your newly loaded OS (Operating System) a
bit more.

Setup Complete
That’s it. You have fully installed Windows XP. Congratulations!
Installing Windows 7
-
1-Enter your computer's BIOS. Turn
off the computer on which you want to install Windows 7 and then turn
it back on. When the BIOS screen appears or you are prompted to do so,
press Del, Esc, F2, F10, or F9 (depending on your computer’s motherboard) to enter the system BIOS. The key to enter the BIOS is usually shown on the screen.
-
-
2
Find your BIOS's boot options menu. The
boot options menu of your BIOS may vary in location or name from the
illustration, but you may eventually find it if you search around.
- If you can't find the boot options menu, search the name of your BIOS (most likely located in the BIOS menu) online for help.
-
3
Select the CD-ROM drive as the first boot device of your computer.
- Although
this method may vary among computers, the boot options menu is
typically a menu of movable device names where you should set your
CD-ROM drive as the first boot device. It can also be a list of devices
that you can set the order of their boot on. Consult a manual or the
internet for help if you're stuck.
-
4
Save the changes of the settings. Press the button indicated on the screen or select the save option from the BIOS menu to save your configuration.
-
5
Shut off your computer. Either
turn off the computer by choosing the shut-down option in your current
operating system, or hold the power button until the computer powers
off.
-
6
Power on the PC and the insert the Windows 7 disc into your CD/DVD drive.
-
7
Start your computer from the disc. After
you have placed the disc into the disc drive, start your computer. When
the computer starts, press a key if you are asked if you would like to
boot from the disc by pressing any key. After you choose to start from
the disc, Windows Setup will begin loading.
- If you are not asked to boot from the disc, you may have done something wrong. Retry the previous steps to solve the problem.
-
8
Choose your Windows Setup options. Once
Windows Setup loads, you'll be presented with a window. Select your
preferred language, keyboard type, and time/currency format, then click Next.
-
9
Click the Install Now button.
-
10
Accept the License Terms. Read over the Microsoft Software License Terms, check I accept the license terms, and click Next.
-
11
Select the Custom installation.
-
12
Decide on which hard drive and partition you want to install Windows on. A hard drive is a physical part of your computer that stores data, and partitions "divide" hard drives into separate parts.
- If the hard drive has data on it, delete the data off of it, or format it.
- Select the hard drive from the list of hard drives.
- Click Drive options (advanced).
- Click Format from Drive options.
- If your computer doesn't have any partitions yet, create one to install Windows on it.
- Select the hard drive from the list of hard drives.
- Click Drive options (advanced).
- Select New from Drive options.
- Select the size, and click OK.
-
13
Install Windows on your preferred hard drive and partition. Once you've decided on where to install Windows, select it and click Next. Windows will begin installing.
Complete Setups as well as you did in win xp
That’s it. You have fully installed Windows XP. Congratulations!
-
see also
-
1-Enter your computer's BIOS. Turn
off the computer on which you want to install Windows 7 and then turn
it back on. When the BIOS screen appears or you are prompted to do so,
press Del, Esc, F2, F10, or F9 (depending on your computer’s motherboard) to enter the system BIOS. The key to enter the BIOS is usually shown on the screen.

- 2Find your BIOS's boot options menu. The boot options menu of your BIOS may vary in location or name from the illustration, but you may eventually find it if you search around.
- If you can't find the boot options menu, search the name of your BIOS (most likely located in the BIOS menu) online for help.
-
3Select the CD-ROM drive as the first boot device of your computer.
- Although this method may vary among computers, the boot options menu is typically a menu of movable device names where you should set your CD-ROM drive as the first boot device. It can also be a list of devices that you can set the order of their boot on. Consult a manual or the internet for help if you're stuck.
-
4Save the changes of the settings. Press the button indicated on the screen or select the save option from the BIOS menu to save your configuration.
-
5Shut off your computer. Either turn off the computer by choosing the shut-down option in your current operating system, or hold the power button until the computer powers off.
-
6Power on the PC and the insert the Windows 7 disc into your CD/DVD drive.
-
7Start your computer from the disc. After you have placed the disc into the disc drive, start your computer. When the computer starts, press a key if you are asked if you would like to boot from the disc by pressing any key. After you choose to start from the disc, Windows Setup will begin loading.
- If you are not asked to boot from the disc, you may have done something wrong. Retry the previous steps to solve the problem.
-
8Choose your Windows Setup options. Once Windows Setup loads, you'll be presented with a window. Select your preferred language, keyboard type, and time/currency format, then click Next.
-
9Click the Install Now button.
-
10Accept the License Terms. Read over the Microsoft Software License Terms, check I accept the license terms, and click Next.
-
11Select the Custom installation.
-
12Decide on which hard drive and partition you want to install Windows on. A hard drive is a physical part of your computer that stores data, and partitions "divide" hard drives into separate parts.
- If the hard drive has data on it, delete the data off of it, or format it.
- Select the hard drive from the list of hard drives.
- Click Drive options (advanced).
- Click Format from Drive options.
- If your computer doesn't have any partitions yet, create one to install Windows on it.
- Select the hard drive from the list of hard drives.
- Click Drive options (advanced).
- Select New from Drive options.
- Select the size, and click OK.
- If the hard drive has data on it, delete the data off of it, or format it.
-
13Install Windows on your preferred hard drive and partition. Once you've decided on where to install Windows, select it and click Next. Windows will begin installing.


Complete Setups as well as you did in win xp
That’s it. You have fully installed Windows XP. Congratulations!
- see also


#/Image:Install-Windows-7-(Beginners)-Step-2.jpg)
#/Image:Install-Windows-7-(Beginners)-Step-3.jpg)
#/Image:Install-Windows-7-(Beginners)-Step-4.jpg)
#/Image:Install-Windows-7-(Beginners)-Step-5.jpg)
#/Image:Install-Windows-7-(Beginners)-Step-6.jpg)
#/Image:Install-Windows-7-(Beginners)-Step-7.jpg)
#/Image:Install-Windows-7-(Beginners)-Step-8.jpg)
#/Image:Install-Windows-7-(Beginners)-Step-9.jpg)
#/Image:Install-Windows-7-(Beginners)-Step-10.jpg)
#/Image:Install-Windows-7-(Beginners)-Step-11.jpg)
#/Image:Install-Windows-7-(Beginners)-Step-12.jpg)
#/Image:Install-Windows-7-(Beginners)-Step-13.jpg)
No comments:
Post a Comment